Adobe provide a document for hardening Adobe Reader DC, but they aren’t really prescriptive about how to implement the maximum hardened state. Based on a number of web resources and the official Adobe guide, I have compiled a list of registry settings that you should enforce via GPO if you want Adobe Reader to be maximally hardened.
Depending on your organisation, you may want to enable certain features if there is a business case, like Adobe Sign or trusting certain sites or folder paths. This configuration is designed to permit the bare minimum required to effectively use Acrobat Reader to read PDFs without allowing executable content within PDFs or permitting online features.
Unfortunately Adobe do not provide recent Group Policy ADMX templates for all of these hardening settings, only for a subset, and many key settings are missing.
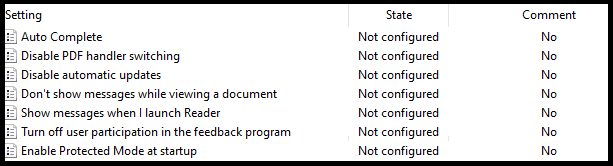
Adobe ADMX Template settings.
Hardening can be applied using the Adobe Configuration Wizard to deploy registry settings during install, however, my preferred option is to use Group Policy Preference registry settings to enforce configuration. Most settings can be configured in HKLM making them enforced where the user cannot change them. Two settings can only be configured in HKCU making them user changeable. Some settings can be configured in either HKLM or HKCU, in these cases, it is recommend to use only HKLM.
Important!
This blog post is refering to the 32-bit Adobe Reader, not the 64-bit Adobe Reader, which uses a different registry path for its settings. If using the 64-bit version, replace ‘Acrobat Reader’ with ‘Adobe Acrobat’, eg. HKLM\Software\Policies\Adobe\Acrobat Reader\DC\ with HKLM\Software\Policies\Adobe\Adobe Acrobat\DC\
| Description | Registry Key | Data Type | Default Value | Setting Options | Recommended Value |
|---|---|---|---|---|---|
| Enable Protected Mode which sandboxes Acrobat and Reader processes | HKLM\Software\Policies\Adobe\Acrobat Reader\DC\FeatureLockDown\bProtectedMode | REG_DWORD | 1 | 0: Do not enable protected mode. 1: Do enable protected mode. |
1 |
| Specifies whether to enable Protected View for files from an untrusted location. | HKLM\Software\Policies\Adobe\Acrobat Reader\DC\FeatureLockDown\iProtectedView | REG_DWORD | 0 | 0: (default) Disable Protected View. 1: (recommended) Enable Protected View for unsafe locations only. 2: Enable Protected View for all files regardless of origin. |
2 |
| Disables trusted files and folders and prevents users from specifying a privileged location for directories. | HKLM\Software\Policies\Adobe\Acrobat Reader\DC\FeatureLockDown\bDisableTrustedFolders | REG_DWORD | 0 | 0: Files and folders can be trusted. 1: Disables and locks file and folder-based privileged locations. |
1 |
| Disables and locks the ability to specify host-based privileged locations (URLs). | HKLM\Software\Policies\Adobe\Acrobat Reader\DC\FeatureLockDown\bDisableTrustedSites | REG_DWORD | 0 | 0: Enables host-based privileged locations. 1: Disables and locks host-based privileged locations. |
1 |
| Trusted sites includes Local Intranet zones. This setting makes IE trust operate as if they were privileged locations in Acrobat Reader. The feature can be disabled with this setting so that IE intranet zones are not trusted. | HKLM\Software\Policies\Adobe\Acrobat Reader\DC\FeatureLockDown\bDisableOSTrustedSites | REG_DWORD | 0 | 0: Do automatically trust Windows OS zones. 1:Don't automatically trust Windows OS zones. |
1 |
| Specifies whether to allow or block all website hyperlinks in a PDF or use a custom setting. | HKCU\Software\Policies\Adobe\Acrobat Reader\DC\TrustManager\cDefaultLaunchURLPerms\iURLPerms | REG_DWORD | 1 | 0: Custom Setting 1: Block all websites 2: Allow all websites |
1 |
| Locks down the Manage Internet Access settings so that users cannot change setting specified in iURLPerms | HKLM\Software\Policies\Adobe\Acrobat Reader\DC\FeatureLockDown\cDefaultLaunchURLPerms\iUnknownURLPerms | REG_DWORD | 1 | 1: Always ask 2: Always allow 3: Always block |
3 |
| Windows OS application-level sandbox which is taken advantage of by Reader. Depends on protected mode being enabled. | HKLM\Software\Policies\Adobe\Acrobat Reader\DC\FeatureLockDown\bEnableProtectedModeAppContainer | REG_DWORD | 0 | 0: Disable Microsoft's AppContainer sandbox 1: Enable Microsoft's AppContainer sandbox |
1 |
| Features are locked down to provide additional hardening. Blocks risky actions on all documents that are not specifically trusted. | HKLM\Software\Policies\Adobe\Acrobat Reader\DC\FeatureLockDown\bEnhancedSecurityStandalone | REG_DWORD | 0 | 0: Disable enhanced security in the standalone application. 1: Enable enhanced security in the standalone application |
1 |
| Toggles enhanced security when the application is running in the browser. | HKLM\Software\Policies\Adobe\Acrobat Reader\DC\FeatureLockDown\bEnhancedSecurityInBrowser | REG_DWORD | 0 | 0: Disable enhanced security in the browser. 1: Enable enhanced security in the browser. |
1 |
| Specifies whether to globally disable and lock JavaScript execution. | HKLM\Software\Policies\Adobe\Acrobat Reader\DC\FeatureLockDown\bDisableJavaScript | REG_DWORD | 0 | 0 or null: Don't disable JS. 1: Disable and lock JS. |
1 |
| Enables enhanced security, Protected Mode, Protected View, and AppContainer for PDF attachments received in Outlook | HKCU\Software\Adobe\Acrobat Reader\DC\TrustManager\bEnableAlwaysOutlookAttachmentProtectedView | REG_DWORD | 0 | 0: Enable Protected View for Outlook attachments. 1: Disable Protected View for Outlook attachments. |
0 |
| Reader allows the user to change the default PDF handler, including changing it to a prior version that is still installed on the system that may not have protected mode or protected view enabled. | HKLM\Software\Policies\Adobe\Acrobat Reader\DC\FeatureLockDown\bDisablePDFHandlerSwitching | REG_DWORD | 0 | 0 (or null): Allow the user to change the default viewer. 1: Don't allow the user to change the default viewer. |
1 |
| Specifies whether to trust and render 3D content. | HKLM\Software\Policies\Adobe\Acrobat Reader\DC\FeatureLockDown\bEnable3D | REG_DWORD | 0 | 0: Don't render 3D content. 1: Trust and render 3D files. |
0 |
| Specifies whether Flash content should be rendered in a PDF. | HKLM\Software\Policies\Adobe\Acrobat Reader\DC\FeatureLockDown\bEnableFlash | REG_DWORD | 0 | 0: Flash content is rendered as an empty, white box and does not play. 1: Flash plays if there is a system player present. If a player is not found, then the user is prompted to download the latest version. |
0 |
| Toggles the Adobe Send and Track plugin for Outlook. Enables sending large files as public links through Outlook. The attached files are uploaded to Adobe Document Cloud and public links to the files are inserted in the email body. | HKLM\Software\Policies\Adobe\Acrobat Reader\DC\FeatureLockDown\cCloud \bAdobeSendPluginToggle | REG_DWORD | 1 | 0: Enable Adobe Send and Track. 1: Disable Adobe Send and Track. |
1 |
| Disables Document Cloud service access except those features controlled by the other preferences. | HKLM\Software\Policies\Adobe\Acrobat Reader\DC\FeatureLockDown\cServices\bToggleAdobeDocumentServices | REG_DWORD | 0 | 0: Enable Document Cloud services. 1: Disable Document Cloud services. |
1 |
| Specifies the default permissions for file types that aren't listed in the default or user-specified lists. | HKLM\Software\Policies\Adobe\Acrobat Reader\DC\FeatureLockDown\cDefaultLaunchAttachmentPerms\iUnlistedAttachmentTypePerm | REG_DWORD | 1 | 0 or null: If a file with an unspecified file extension is launched, then a dialog appears with two options: Open File and Never Allow. 1: If a file with an unspecified file extension is launched then a dialog appears with three options: Open File, Always Allow, and Never Allow. 2: Always launch files of unspecified Types. The file opens if its extension is associated with an extension. 3: Never launch files of Unspecified Types. |
3 |
| Disables Adobe Send for Signature (Acrobat Sign). | HKLM\Software\Policies\Adobe\Acrobat Reader\DC\FeatureLockDown\cServices\bToggleAdobeSign | REG_DWORD | 0 | 0: Enable Adobe Send for Signature (Acrobat Sign). 1: Disable Adobe Send for Signature (Acrobat Sign). |
1 |
| Disables preferences synchronization. This preference disables and locks a new feature which synchronizes desktop preferences across devices on which the user is signed in with an Adobe ID (including phones). | HKLM\Software\Policies\Adobe\Acrobat Reader\DC\FeatureLockDown\cServices\bTogglePrefSync | REG_DWORD | 0 | 0: Ensable preferences synchronization. 1: Disable preferences synchronization. |
1 |
| Specifies whether to enable cloud storage connectors. | HKLM\Software\Policies\Adobe\Acrobat Reader\DC\FeatureLockDown\cServices\bToggleWebConnectors | REG_DWORD | 0 | 0: Enable 3rd party connectors. 1: Disable 3rd party connectors. |
1 |
| Disables the Updater and removes associated user interface items. | HKLM\Software\Policies\Adobe\Acrobat Reader\DC\FeatureLockDown\bUpdater | REG_DWORD | 1 | 0: Disables and locks the Updater. 1: No effect. |
0 |
| Disables both updates to the product's web-plugin components as well as all Adobe online services. | HKLM\Software\Policies\Adobe\Acrobat Reader\DC\FeatureLockDown\cServices\bUpdater | REG_DWORD | 1 | 0: Disable services and service component updates. 1: Enable services. |
0 |
| Specifies whether to send usage measurement data back to Adobe and controls the welcome screen. | HKLM\Software\Policies\Adobe\Acrobat Reader\DC\FeatureLockDown\bUsageMeasurement | REG_DWORD | 1 | 0: Don't send usage details to Adobe, and disable the welcome screen. 1: Send usage details. |
0 |
| Disables the SharePoint and Office 365 integration features. Controls the application's ability to detect that a file came from a SharePoint server, disables the check-out prompt, and removes the SharePoint specific menu items. | HKLM\Software\Policies\Adobe\Acrobat Reader\DC\FeatureLockDown\cSharePoint\bDisableSharePointFeatures | REG_DWORD | 0 | 0: Same as "null." Don't disable SharePoint and Office 365 integration. 1: Disable SharePoint and Office 365 integration. |
1 |
| Specifies whether to disable Webmail as an option in the built-in share to email function. If disabled, the only option will be the installed Outlook application. | HKLM\Software\Policies\Adobe\Acrobat Reader\DC\FeatureLockDown\cWebmailProfiles\bDisableWebmail | REG_DWORD | 0 | 0: Outlook and Webmail options are available 1: Webmail option is greyed out |
1 |
| Change the email icon behaviour so that it attaches the document to an email. | HKLM\Software\Policies\Adobe\Acrobat Reader\DC\FeatureLockDown\bSendMailShareRedirection | REG_DWORD | 1 | 0: Change the email icon behaviour to automatically attach the file to an email. 1: The email icon opens the share pane. |
0 |
| Specifies whether to display the generative AI features in Acrobat Reader for signed out users. | HKLM\Software\Policies\Adobe\Acrobat Reader\DC\FeatureLockDown\bEnableGentech | REG_DWORD | 1 | 0: Turn off the generative AI features. 1: Turn on the generative AI features. |
0 |
| Disables messages which encourage the user to upgrade the product. | HKLM\Software\Policies\Adobe\Acrobat Reader\DC\FeatureLockDown\bAcroSuppressUpsell | REG_DWORD | 0 | 0 or null: Don't disable upsell. 1: Disable upsell. |
1 |
| Specifies whether to show messages from Adobe when a document opens. | HKLM\Software\Policies\Adobe\Acrobat Reader\DC\FeatureLockDown\cIPM\bDontShowMsgWhenViewingDoc | REG_DWORD | 1 | 0: Don't show messages from Adobe when a document opens. 1: Show messages from Adobe when a document opens. |
0 |
To make it easy to import these settings on a reference machine so that the keys can be imported into Group Policy, please see below user and system registry keys that can be saved as .reg and imported.
User registry settings:
Windows Registry Editor Version 5.00

[HKEY_CURRENT_USER\Software\Policies\Adobe]

[HKEY_CURRENT_USER\Software\Policies\Adobe\Acrobat Reader]

[HKEY_CURRENT_USER\Software\Policies\Adobe\Acrobat Reader\DC]

[HKEY_CURRENT_USER\Software\Policies\Adobe\Acrobat Reader\DC\TrustManager]

[HKEY_CURRENT_USER\Software\Policies\Adobe\Acrobat Reader\DC\TrustManager\cDefaultLaunchURLPerms]
"iURLPerms"=dword:00000001

[HKEY_CURRENT_USER\Software\Adobe]

[HKEY_CURRENT_USER\Software\Adobe\Acrobat Reader]

[HKEY_CURRENT_USER\Software\Adobe\Acrobat Reader\DC]

[HKEY_CURRENT_USER\Software\Adobe\Acrobat Reader\DC\TrustManager]
"bEnableAlwaysOutlookAttachmentProtectedView"=dword:00000000
System registry settings:
Windows Registry Editor Version 5.00

[HKEY_LOCAL_MACHINE\SOFTWARE\Policies\Adobe]

[HKEY_LOCAL_MACHINE\SOFTWARE\Policies\Adobe\Acrobat Reader]

[HKEY_LOCAL_MACHINE\SOFTWARE\Policies\Adobe\Acrobat Reader\DC]

[HKEY_LOCAL_MACHINE\SOFTWARE\Policies\Adobe\Acrobat Reader\DC\FeatureLockDown]
"bProtectedMode"=dword:00000001
"iProtectedView"=dword:00000002
"bDisableTrustedFolders"=dword:00000001
"bDisableTrustedSites"=dword:00000001
"bDisableOSTrustedSites"=dword:00000001
"bEnableProtectedModeAppContainer"=dword:00000001
"bEnhancedSecurityStandalone"=dword:00000001
"bEnhancedSecurityInBrowser"=dword:00000001
"bDisableJavaScript"=dword:00000001
"bDisablePDFHandlerSwitching"=dword:00000001
"bEnable3D"=dword:00000000
"bEnableFlash"=dword:00000000
"bUpdater"=dword:00000000
"bUsageMeasurement"=dword:00000000
"bSendMailShareRedirection"=dword:00000000
"bEnableGentech"=dword:00000000
"bAcroSuppressUpsell"=dword:00000001

[HKEY_LOCAL_MACHINE\SOFTWARE\Policies\Adobe\Acrobat Reader\DC\FeatureLockDown\cCloud]
"bAdobeSendPluginToggle"=dword:00000001

[HKEY_LOCAL_MACHINE\SOFTWARE\Policies\Adobe\Acrobat Reader\DC\FeatureLockDown\cDefaultLaunchAttachmentPerms]
"iUnlistedAttachmentTypePerm"=dword:00000003

[HKEY_LOCAL_MACHINE\SOFTWARE\Policies\Adobe\Acrobat Reader\DC\FeatureLockDown\cDefaultLaunchURLPerms]
"iUnknownURLPerms"=dword:00000003

[HKEY_LOCAL_MACHINE\SOFTWARE\Policies\Adobe\Acrobat Reader\DC\FeatureLockDown\cIPM]
"bDontShowMsgWhenViewingDoc"=dword:00000000

[HKEY_LOCAL_MACHINE\SOFTWARE\Policies\Adobe\Acrobat Reader\DC\FeatureLockDown\cServices]
"bToggleAdobeDocumentServices"=dword:00000001
"bToggleAdobeSign"=dword:00000001
"bTogglePrefSync"=dword:00000001
"bToggleWebConnectors"=dword:00000001
"bUpdater"=dword:00000000

[HKEY_LOCAL_MACHINE\SOFTWARE\Policies\Adobe\Acrobat Reader\DC\FeatureLockDown\cSharePoint]
"bDisableSharePointFeatures"=dword:00000001

[HKEY_LOCAL_MACHINE\SOFTWARE\Policies\Adobe\Acrobat Reader\DC\FeatureLockDown\cWebmailProfiles]
"bDisableWebmail"=dword:00000001
If you prefer PowerShell, here is a script to configure the settings:
# Adobe Acrobat Reader DC Registry Configuration Script
# Run this script with Administrator privileges

# Function to create registry keys if they don't exist
function Set-RegistryValue {
    param (
        [string]$Path,
        [string]$Name,
        [string]$Type,
        [int]$Value
    )

    # Create the registry path if it doesn't exist
    if (-not (Test-Path $Path)) {
        New-Item -Path $Path -Force | Out-Null
        Write-Host "Created registry path: $Path" -ForegroundColor Green
    }

    # Set the registry value
    New-ItemProperty -Path $Path -Name $Name -Value $Value -PropertyType $Type -Force | Out-Null
    Write-Host "Set $Path\$Name = $Value" -ForegroundColor Cyan
}

Write-Host "Configuring Adobe Acrobat Reader DC Registry Settings..." -ForegroundColor Yellow
Write-Host ""

# HKLM Settings
Set-RegistryValue -Path "HKLM:\Software\Policies\Adobe\Acrobat Reader\DC\FeatureLockDown" -Name "bProtectedMode" -Type "DWORD" -Value 1
Set-RegistryValue -Path "HKLM:\Software\Policies\Adobe\Acrobat Reader\DC\FeatureLockDown" -Name "iProtectedView" -Type "DWORD" -Value 2
Set-RegistryValue -Path "HKLM:\Software\Policies\Adobe\Acrobat Reader\DC\FeatureLockDown" -Name "bDisableTrustedFolders" -Type "DWORD" -Value 1
Set-RegistryValue -Path "HKLM:\Software\Policies\Adobe\Acrobat Reader\DC\FeatureLockDown" -Name "bDisableTrustedSites" -Type "DWORD" -Value 1
Set-RegistryValue -Path "HKLM:\Software\Policies\Adobe\Acrobat Reader\DC\FeatureLockDown" -Name "bDisableOSTrustedSites" -Type "DWORD" -Value 1
Set-RegistryValue -Path "HKLM:\Software\Policies\Adobe\Acrobat Reader\DC\FeatureLockDown\cDefaultLaunchURLPerms" -Name "iUnknownURLPerms" -Type "DWORD" -Value 3
Set-RegistryValue -Path "HKLM:\Software\Policies\Adobe\Acrobat Reader\DC\FeatureLockDown" -Name "bEnableProtectedModeAppContainer" -Type "DWORD" -Value 1
Set-RegistryValue -Path "HKLM:\Software\Policies\Adobe\Acrobat Reader\DC\FeatureLockDown" -Name "bEnhancedSecurityStandalone" -Type "DWORD" -Value 1
Set-RegistryValue -Path "HKLM:\Software\Policies\Adobe\Acrobat Reader\DC\FeatureLockDown" -Name "bEnhancedSecurityInBrowser" -Type "DWORD" -Value 1
Set-RegistryValue -Path "HKLM:\Software\Policies\Adobe\Acrobat Reader\DC\FeatureLockDown" -Name "bDisableJavaScript" -Type "DWORD" -Value 1
Set-RegistryValue -Path "HKLM:\Software\Policies\Adobe\Acrobat Reader\DC\FeatureLockDown" -Name "bDisablePDFHandlerSwitching" -Type "DWORD" -Value 1
Set-RegistryValue -Path "HKLM:\Software\Policies\Adobe\Acrobat Reader\DC\FeatureLockDown" -Name "bEnable3D" -Type "DWORD" -Value 0
Set-RegistryValue -Path "HKLM:\Software\Policies\Adobe\Acrobat Reader\DC\FeatureLockDown" -Name "bEnableFlash" -Type "DWORD" -Value 0
Set-RegistryValue -Path "HKLM:\Software\Policies\Adobe\Acrobat Reader\DC\FeatureLockDown\cCloud" -Name "bAdobeSendPluginToggle" -Type "DWORD" -Value 1
Set-RegistryValue -Path "HKLM:\Software\Policies\Adobe\Acrobat Reader\DC\FeatureLockDown\cServices" -Name "bToggleAdobeDocumentServices" -Type "DWORD" -Value 1
Set-RegistryValue -Path "HKLM:\Software\Policies\Adobe\Acrobat Reader\DC\FeatureLockDown\cDefaultLaunchAttachmentPerms" -Name "iUnlistedAttachmentTypePerm" -Type "DWORD" -Value 3
Set-RegistryValue -Path "HKLM:\Software\Policies\Adobe\Acrobat Reader\DC\FeatureLockDown\cServices" -Name "bToggleAdobeSign" -Type "DWORD" -Value 1
Set-RegistryValue -Path "HKLM:\Software\Policies\Adobe\Acrobat Reader\DC\FeatureLockDown\cServices" -Name "bTogglePrefSync" -Type "DWORD" -Value 1
Set-RegistryValue -Path "HKLM:\Software\Policies\Adobe\Acrobat Reader\DC\FeatureLockDown\cServices" -Name "bToggleWebConnectors" -Type "DWORD" -Value 1
Set-RegistryValue -Path "HKLM:\Software\Policies\Adobe\Acrobat Reader\DC\FeatureLockDown" -Name "bUpdater" -Type "DWORD" -Value 0
Set-RegistryValue -Path "HKLM:\Software\Policies\Adobe\Acrobat Reader\DC\FeatureLockDown\cServices" -Name "bUpdater" -Type "DWORD" -Value 0
Set-RegistryValue -Path "HKLM:\Software\Policies\Adobe\Acrobat Reader\DC\FeatureLockDown" -Name "bUsageMeasurement" -Type "DWORD" -Value 0
Set-RegistryValue -Path "HKLM:\Software\Policies\Adobe\Acrobat Reader\DC\FeatureLockDown\cSharePoint" -Name "bDisableSharePointFeatures" -Type "DWORD" -Value 1
Set-RegistryValue -Path "HKLM:\Software\Policies\Adobe\Acrobat Reader\DC\FeatureLockDown\cWebmailProfiles" -Name "bDisableWebmail" -Type "DWORD" -Value 1
Set-RegistryValue -Path "HKLM:\Software\Policies\Adobe\Acrobat Reader\DC\FeatureLockDown" -Name "bSendMailShareRedirection" -Type "DWORD" -Value 0
Set-RegistryValue -Path "HKLM:\Software\Policies\Adobe\Acrobat Reader\DC\FeatureLockDown" -Name "bEnableGentech" -Type "DWORD" -Value 0
Set-RegistryValue -Path "HKLM:\Software\Policies\Adobe\Acrobat Reader\DC\FeatureLockDown" -Name "bAcroSuppressUpsell" -Type "DWORD" -Value 1
Set-RegistryValue -Path "HKLM:\Software\Policies\Adobe\Acrobat Reader\DC\FeatureLockDown\cIPM" -Name "bDontShowMsgWhenViewingDoc" -Type "DWORD" -Value 0

# HKCU Settings
Set-RegistryValue -Path "HKCU:\Software\Policies\Adobe\Acrobat Reader\DC\TrustManager\cDefaultLaunchURLPerms" -Name "iURLPerms" -Type "DWORD" -Value 1
Set-RegistryValue -Path "HKCU:\Software\Adobe\Acrobat Reader\DC\TrustManager" -Name "bEnableAlwaysOutlookAttachmentProtectedView" -Type "DWORD" -Value 0

Write-Host ""
Write-Host "Adobe Acrobat Reader DC registry configuration completed successfully!" -ForegroundColor Green
Thanks for reading!


You must be logged in to post a comment.