Recently I was trying to delegate Group Policy Modelling in an AD Domain so that we could remotely query RSoP data from a management server with RSAT installed. I had assumed this was as simple as granting a user or group the ‘Generate Resultant Set of Policy (Planning)’ permission from the AD Delegation Wizard.

When I tested granting this to my group, I was not able to model RSoP data using the Group Policy Management Console. So went digging and worked through this in my lab to come to an understanding of the issue.

After some trial and error, I realised the Windows Component Object model (COM) governs remote access to domain controllers which is required for remotely accessing Group Policy Modelling.

By default, the following groups have security limits set to allow:
Everyone: Local Launch, Local Activation
Administrators: Local Launch, Local Activation, Remote Launch, Remote Activation
Performance Log Users: Local Launch, Local Activation, Remote Launch, Remote Activation
Distributed COM Users: Local Launch, Local Activation, Remote Launch, Remote Activation
I tried adding my test user to the builtin ‘Distributed COM Users‘ group and wallah! I was able to use Group Policy Modelling remotely.

Group Description: Members are allowed to launch, activate and use Distributed COM objects on this machine.
Unless a user is a member of one of the above groups with Remote Activation set to ‘allow’, then they will be instantly denied when they try to do Group Policy Modelling remotely.
I have confirmed this by logging into a member server with RSAT installed, as a Domain Admin user, then on a domain controller, unticking ‘allow’ for the Administrators group for Remote Activation on properties of the ‘Component Services\Computers\My Computer’ object on the ‘COM Security’ tab in ‘edit limits’:

In this state, a Domain Admin is unable to invoke Group Policy Modelling remotely. If I re-tick remote activation (default state) then the Domain Admin can perform Group Policy Modelling remotely.
But what happens if you have multiple domain controllers? You don’t want to have to set this individually on every domain controller, and also set it on any new domain controllers that may be added later. A colleague and I were discussing this, and he managed to find a Windows Server 2003 article that is still relevant, and available on the Wayback machine, albeit long gone from the public internet.
https://web.archive.org/web/20140501014941/http:/support.microsoft.com/kb/914047
As you can see, Microsoft call out this exact issue, and also provide a solution for deploying the access to multiple domain controllers. Even better, it makes it straight forward to create your own delegation group and apply it to all domain controllers:
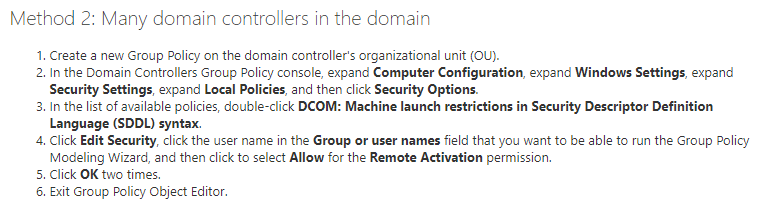

Once the GPO has been set, the setting cannot be controlled from Component Services, so ensure you capture current settings and ensure anything non-default is also added to your policy.

Hopefully this helps someone! Thanks for reading.


You must be logged in to post a comment.